Project Name
Weather Lamp
Summary
I am going to build a RGB weather lamp that changes color depending on the temperature range and sun/moon by using the openweathermap.org API. I’m excited to build this because this is my first hardware project and just the idea of making something that I can use in my day to day life is so exciting! Instead of having to use my phone to check the weather in the morning, I can just look at the lamp which in my opinion is much cuter and convenient. I will also add a switch to the lamp to turn it off and on when needed.
Plan
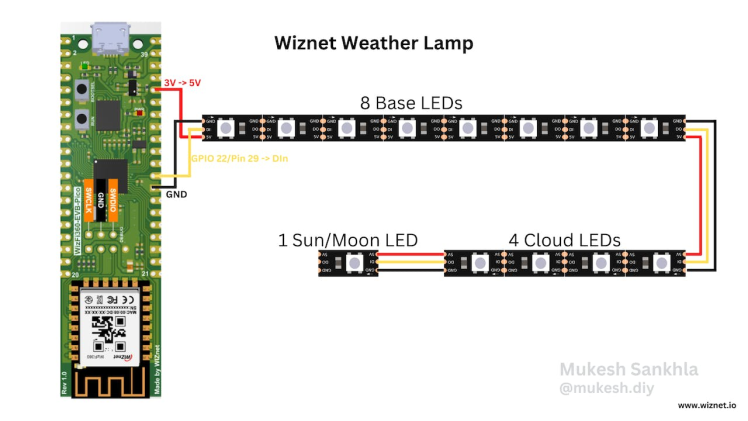
To make this lamp I will follow the guide mukesh-sankhla on electro-maker made. (https://www.electromaker.io/project/view/weather-lamp#items-used-in-this-project) To make this project a bit more personal I will design my own 3D model in solidworks and add a switch to control the lamp. My current 3D model idea for the lamp model is Snoopy sleeping on top of his doghouse. I’ll put the breadboard and circuit board on the base of the doghouse and the doghouse will change colors depending on the temperature.
Getting into the specifics, first, I will buy the hardware components needed for this project- the WizFi360, LED strip, white filament, soldering kit, connecting wire, a micro USB cable, jumper wires, a breadboard, and an on and off switch.
Afterwards, I will design the doghouse model in solidworks and print them on my brothers 3D printing machine using the printer filament.
For Snoopy, since I’m new to 3D modeling I will use a 3D model of Sleeping Snoopy FRANK1927 made on cults3d. (https://cults3d.com/en/3d-model/art/sleeping-snoopy)
Next, I will connect the WizFi 360 to the breadboard using a male-to-male jumper wire.
Following that, I will connect the data pin of the LED strip to a digital pin on the WizFi 360 using the soldering kit and connecting wires. I will use the circuit connection guide mukesh-sankhla created. (https://www.electromaker.io/uploads/images/projects/2829/story/medium/Mukesh_Sankhla_story_image_1666866936904869.png)
I will then connect the power and ground pins of the LED strip to the power and ground rails of the breadboard by locating the VCC and GND pins on the LED strip and then inserting the VCC pin into the power rail of the breadboard and the GND pin into the ground rail of the breadboard. I will use female-to-female jumper wires.
To control the circuit I will use the on/off switch and use this video (https://www.youtube.com/watch?v=xDDYHzrV1QM&ab_channel=ENGRTUTOR) as a guide. I will connect the switch to the digital pin on the WizFi 360 and the ground rail on the breadboard. I will use a male-to-female jumper wire for this part.
Once I finish I will assemble and glue (using super glue) the parts together with the circuit board and breadboard being inside of the lamp on the base.
Afterwards, I will go to openweathermap.org and copy the API key.
Next, on my computer I’ll download WizFi360 Arduino Library, Adafruit_NeoPixel library, and Arduino Code.
On line 20 of the Arduino Code I will edit the code to connect it to my wifi.
And then on line 153 I will edit the code to make the time zone match mine.
Following that, on line 282 I will input my location-Longitude and Latitude and imput my theopenweathermap API key.
Finally, I will connect the lamp to my computer using a MicroUSB cable and compile and upload the code.
This will then allow the lamp to connect with my wifi and display the output.
Budget
| Total | $154.28 |